Whether you’re remodeling your kitchen or adding storage to a laundry room, accurate measurements are key to perfectly fitting cabinets. Taking the time to measure carefully can save you from costly mistakes and frustrating adjustments down the road.
Here’s how to do it right:
1. Gather Your Tools
- Measuring tape (25 ft preferred)
 Pencil and graph paper (or tablet/sketchpad)
- Level (for checking wall/ceiling squareness)
- Step ladder (for high soffits or cabinets)
- Optional: straight-edge ruler, contour gauge for molding profiles
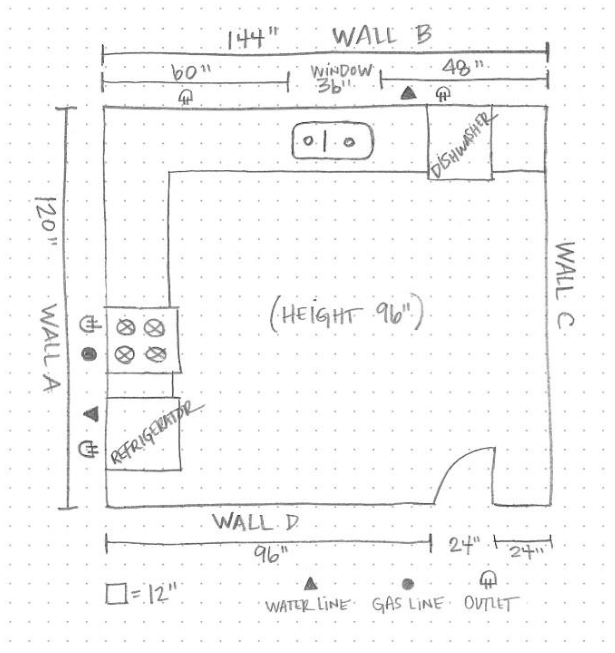
2. Sketch the Room
- Draw a scaled overhead layout (e.g., 1 square = 6″)
- Label each wall (A, B, C…) and note existing elements—windows, doors, vents, appliances
3. Measure Wall Dimensions
- Measure every wall from corner to corner
- Measure ceiling height at multiple points (corners and center)
- Check how square the space is—mark 3′ on one wall, 4′ on the adjacent, and measure diagonally (should be ~5′ if square)
4. Measure Openings and Obstructions
- For each window or door, measure: width (outside trim to trim), height (floor to sill, sill to top of trim)
- Mark distances from corners or adjacent walls
- Also note positions and heights of outlets, vents, switches, gas/water lines, HVAC runs
5. Measure Appliances & Utilities
- Measure existing or planned appliances (width × depth × height):
- Standard dishwasher: ~24″
- Range: ~30″
- Fridge: 30–36″ (check model-specific specs)
- Mark utility centerlines relative to fixed points like walls or corners
6. Record Cabinet Space
- Measure where the cabinets will go:
- Base cabinet depth (usually 24″) and width of space
- Wall cabinet width, depth (typically 12″), and planned height above the countertop (standard 18″ clearance)
- Measure total available height for full-height or pantry cabinets, making sure to account for ceiling height and tipping clearances
7. Double-Check Everything
- Measure each dimension at least twice
- Re-check diagonals to confirm squareness
- Look for protrusions (trim, baseboards, uneven floors) that may affect fitment
8. Allow for Clearances & Finishes
- Leave ~¼″–½″ clearance around cabinets for adjustments
- Account for toe kick height and crown molding if used
- If walls or floors aren’t plumb, plan for shimming to level cabinets
✅ Final Checklist
|
Confirmed |
Item |
|---|---|
| ✅ | Walls measured end-to-end & ceiling height recorded |
| ✅ | Layout sketched with features and utilities |
| ✅ | Appliances measured with clearances |
| ✅ | Squareness both horizontally and vertically checked |
| ✅ | Clearances for molding, appliances, and uneven surfaces accounted for |
Tips from the Pros
- Squareness matters: A 3-4-5 check ensures walls are square; shims can fix minor issues
- Tipping clearance: For tall cabinets, ensure diagonal height won’t hit ceiling when up right
- Adjust for trim: If baseboards protrude, use a contour gauge to replicate the profile and trim the cabinet backing
- Separate toe kicks: Off-site build tall cabinets without toe kicks for easier installation, then add them later
Final Thoughts
Meticulous planning now prevents headaches during installation. A detailed drawing, accurate field measurements, and room for adjustments ensure your cabinets will fit beautifully, already leveled, square, and trimmed. Once measured, you’ll be ready to confidently tackle layout design or hand over precise data to your cabinet supplier or installer.
Need help selecting specific cabinet sizes, tips on layout design, or appliance placement? Just say the word!

Be Inspired!
Be the first to know about new designs, industry trends, and special events.